Pipeline
Concept
The connector crawls items from a source system and feeds these items into a target system through a pipeline. To adjust or process each item before it gets ingested, it is possible to provide custom stages for this pipeline. These stages are software modules provided by us which can be uploaded and configured via the UI.
How to upload and use stages
To upload a stage open the pipeline view:

Then click on the + symbol between Source System and Target System and the Select Pipeline Stage view pops up:
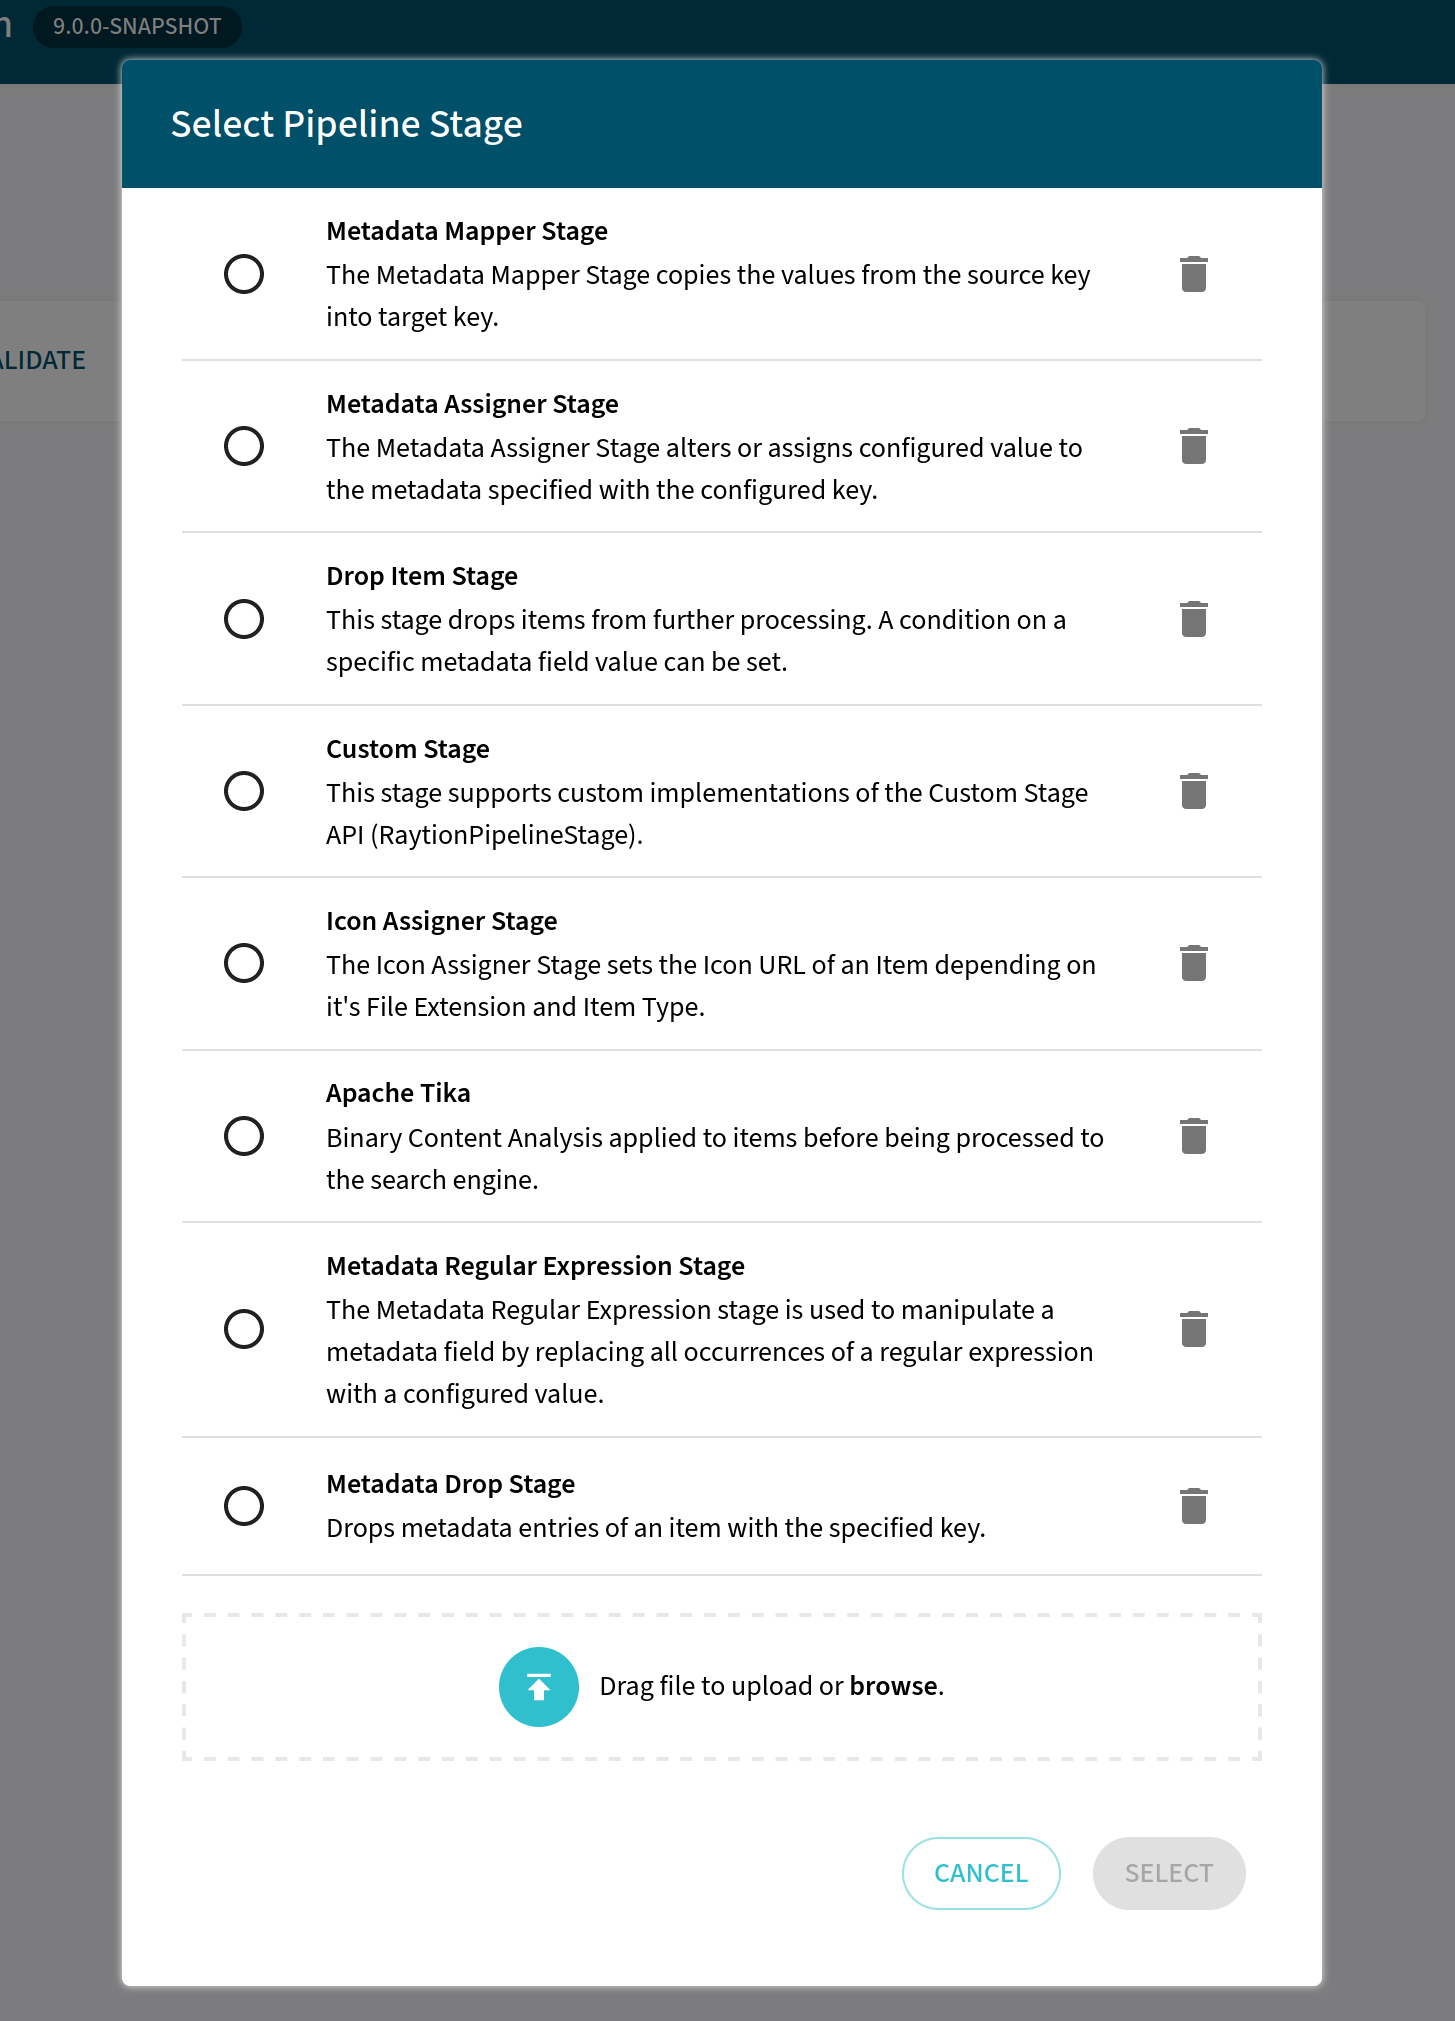
Here you can see stages which are already uploaded to the connector. To upload a new stage, drag and drop the respective software module or click on Drag file to upload or browse to navigate to and select the module.
Once the module is uploaded it is listed in the available stages where it can be selected. After selecting the stage it is shown as step in the pipeline where it can be configured:
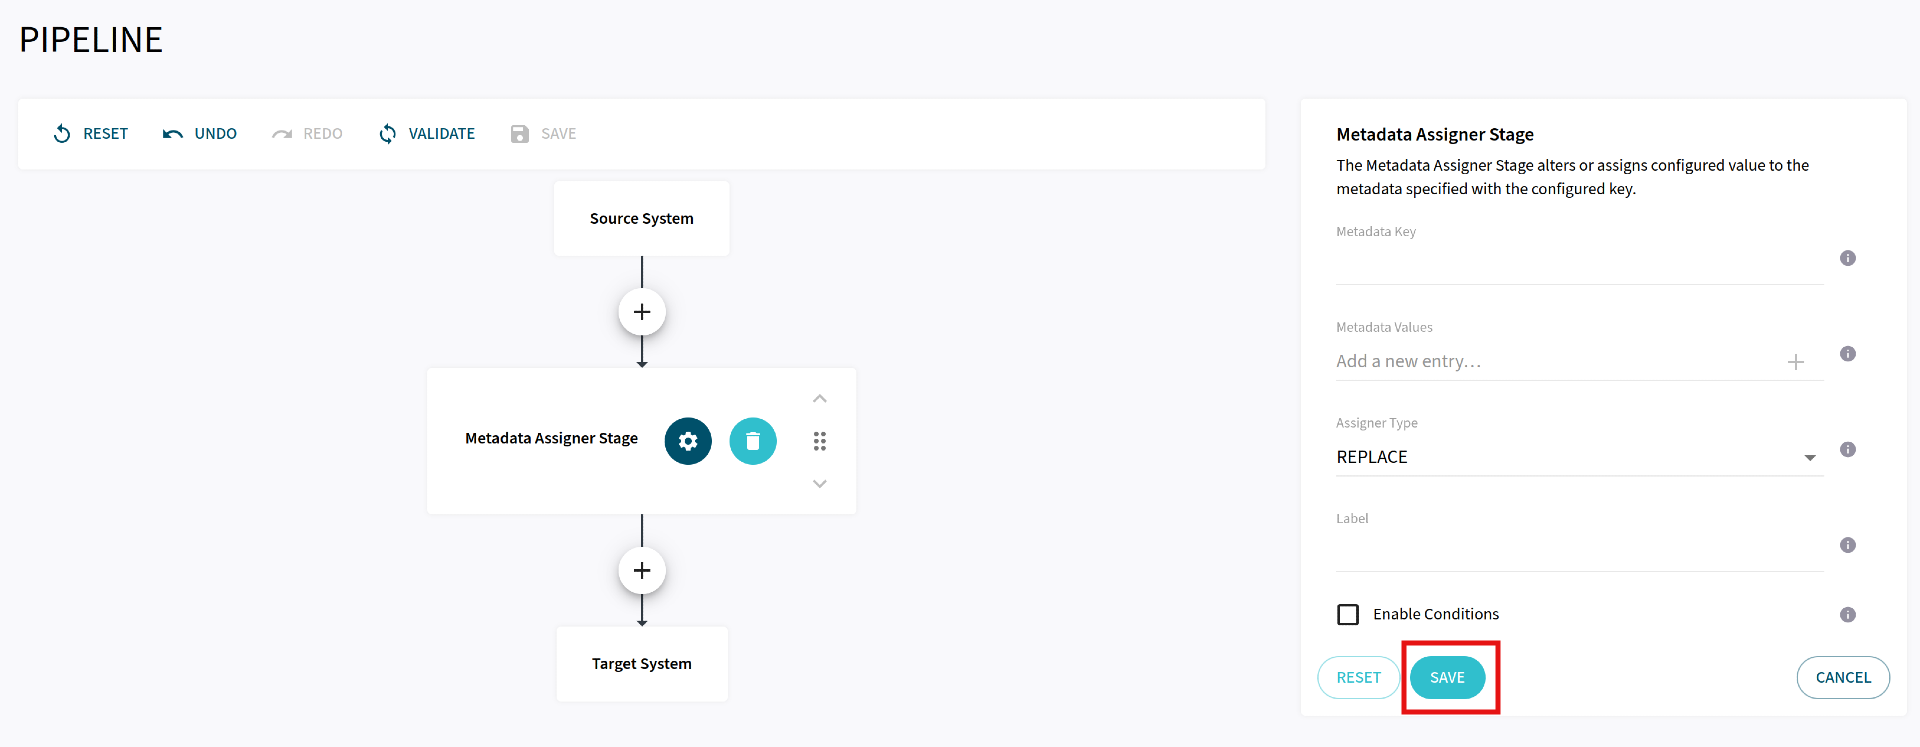
After completing the configuration of this single stage, it has to be saved by pressing SAVE.
It is possible to set up and configure multiple custom stages in any order.
To apply stages this setup of stages has to be validated by clicking on VALIDATE.
If there is something wrong ion the configuration, the connector indicates the wrongly configurated stage and fields.
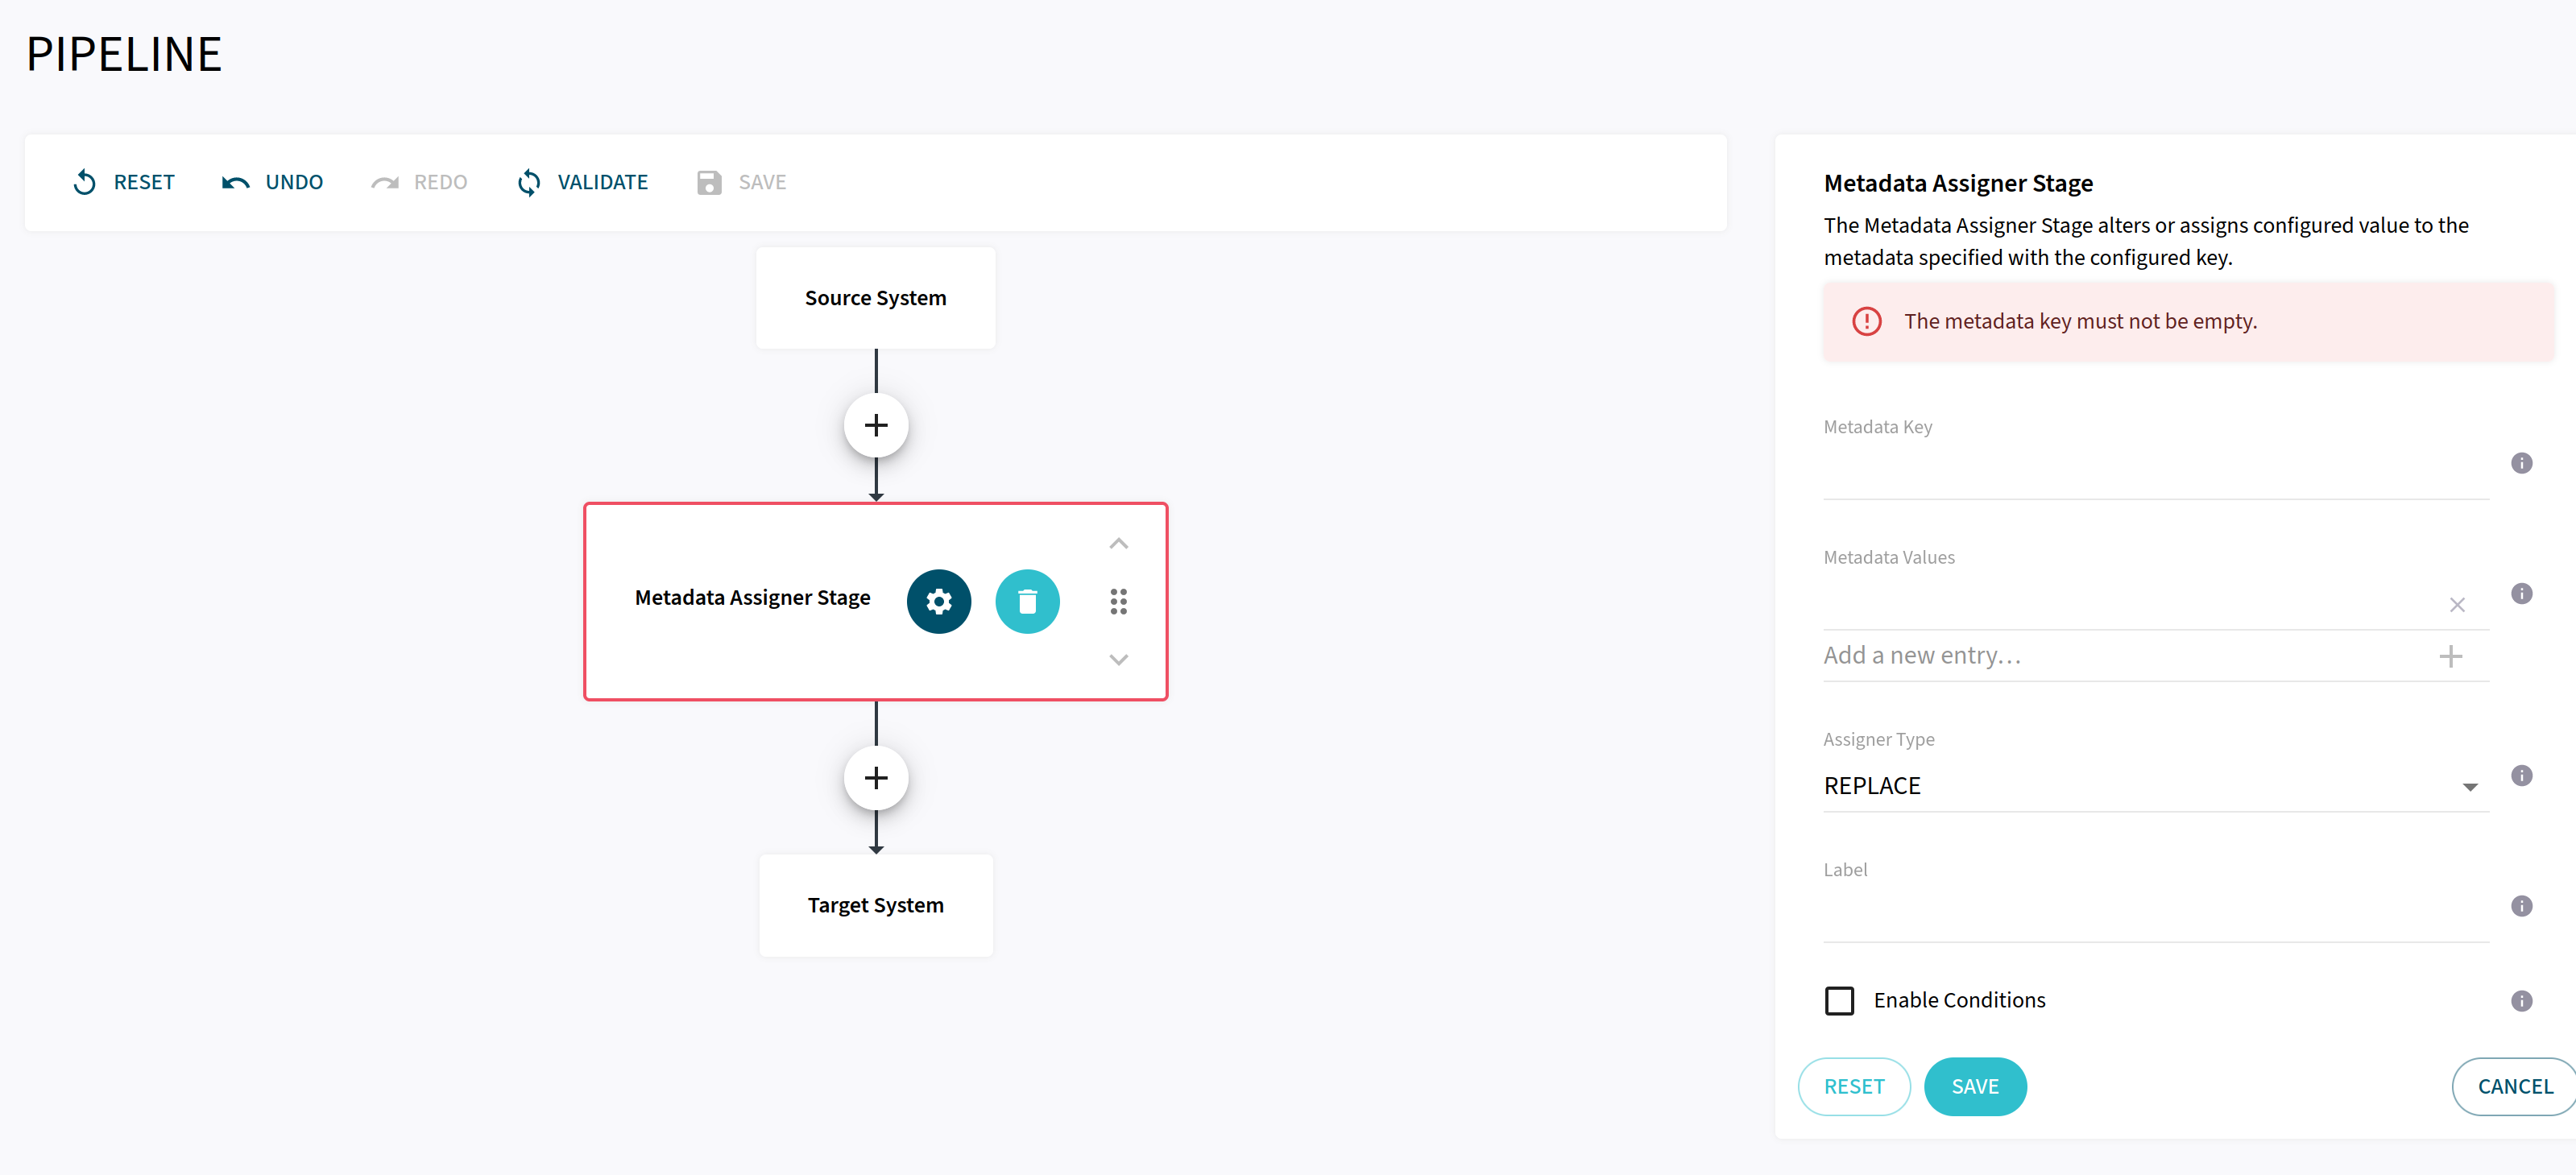
After a correct validation, save by pressing the respective buttons.
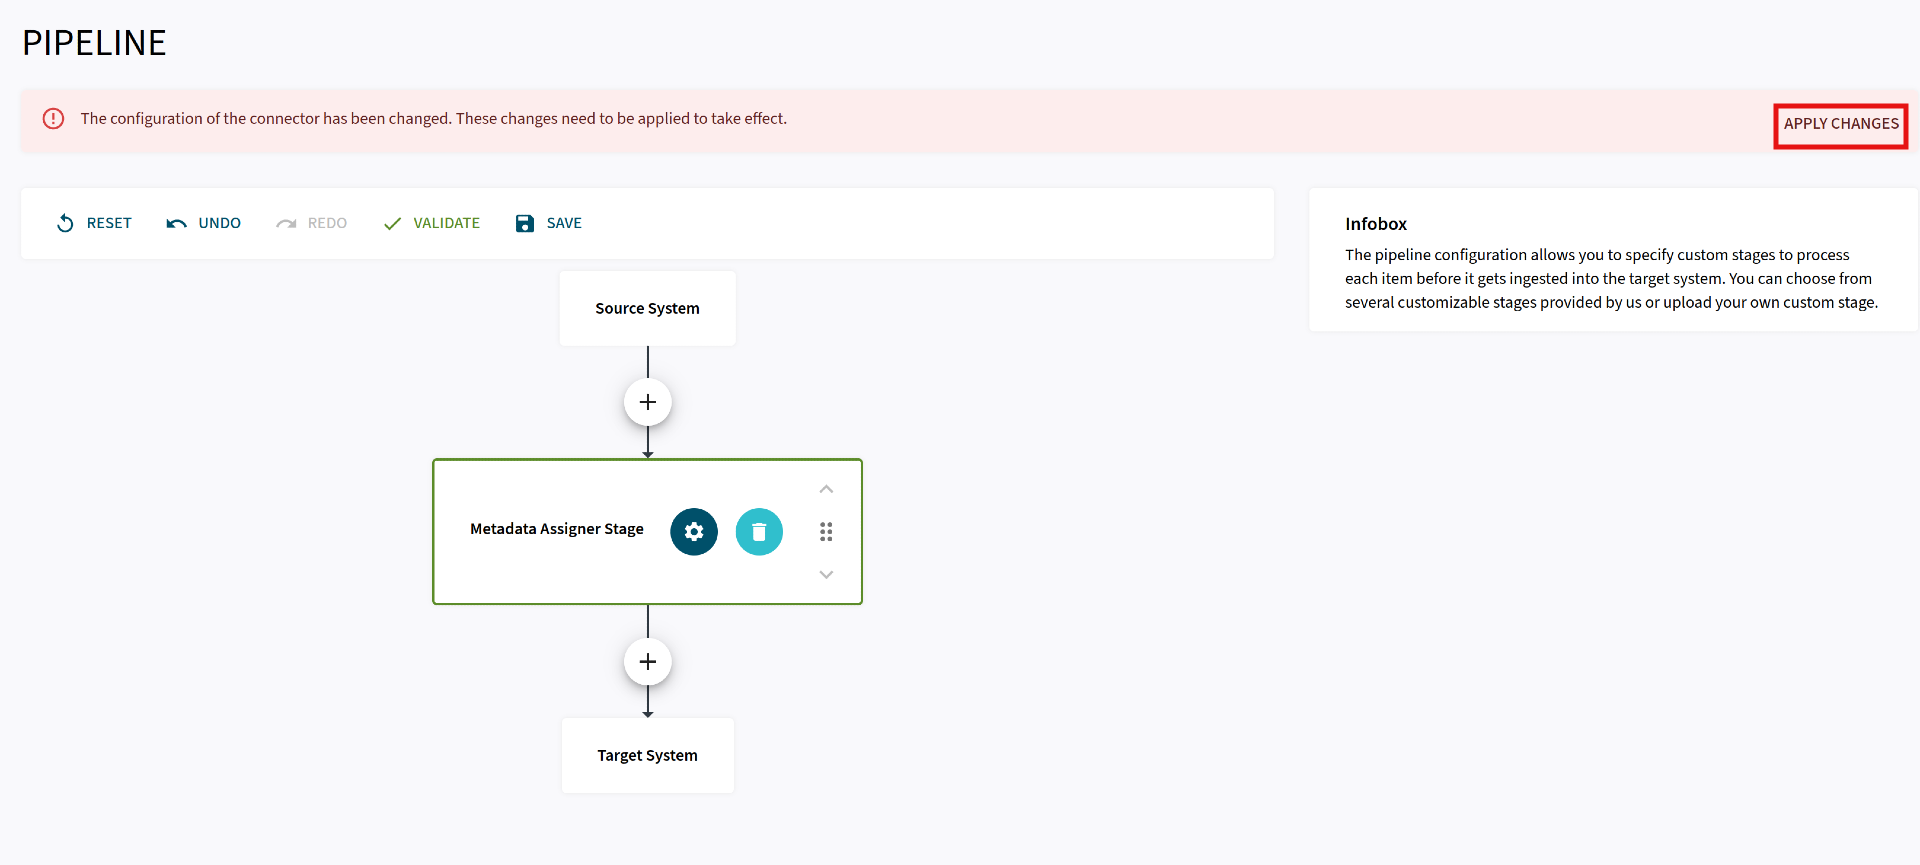
After saving the setup, the connector has to be restarted so that the pipeline stages are applied in the next traversals.
This can be done by pressing Apply Changes on the popped up message:
Default packaged stages
The connector is packaged with pipeline stages which are delivered but not applied by default:
Metadata Regular Expression Stage
The Metadata Regular Expression Stage is used to manipulate a metadata field by replacing all occurrences of a regular expression with a configured value.
Configuration
| Property | Description |
|---|---|
Metadata Key |
Key of the target metadata. |
Pattern |
The pattern to match and replace with the value. |
Metadata Value |
The value to replace the matched string with |
Prefix |
A prefix to add in front of the current value |
Suffix |
A suffix to add behind the current value |
Label |
Exclusive name of the stage. |
Icon Assigner Stage
The Icon Assigner Stage sets the Item’s Icon URL based on the Item’s File Extension and Item Type.
Configuration
| Property | Description |
|---|---|
Item Types |
The Icon will only be assigned if one of the Item Types matches. If none are defined, all Item Types will be accepted. |
File Extensions |
The Icon will only be assigned if one of the File Extensions matches. If none are defined, all File Extensions will be accepted. |
Icon URL |
The Icon URL that will be added to the item if it matches both an Item Type and a File Extension. |
Icon Metadata Key |
The Key under which the Icon will be added to the metadata. |
Label |
Exclusive name of the stage. |
Enable Conditions |
Conditions on which an item should be assigned an Icon’s URL. |
Metadata Assigner Stage
The Metadata Assigner Stage alters or assigns a metadata value.
Configuration
| Property | Description |
|---|---|
Metadata Key |
Key of the target metadata. |
Metadata Values |
The list of values which should be assigned to the metadata field using the specified assigner type strategy. |
Assigner Type |
The strategy how the metadata value is appended (APPEND, REPLACE or IGNORE). |
Label |
Exclusive name of the stage. |
Enable Conditions |
Conditions on which an item’s metadata should be assigned. |
Metadata Mapper Stage
The Metadata Mapper Stage copies the values from the source key into target key.
Drop Item Stage
This stage drops items from further processing. A condition on a specific metadata field value can be set.
Custom Stage
This stage supports custom implementations of the Custom Stage API (RaytionPipelineStage). For additional details on implementation, please refer to How to add a custom stage?.
Configuration
| Property | Description |
|---|---|
Stage Class Name |
The fully qualified name of the class implementing RaytionPipelineStage. |
Key-Value Pairs |
The keys with their respective values to be given into the Custom Pipeline Stage. Keys and Values are delimited by a '=' (i.e. key1=value1). |
Label |
Exclusive name of the stage. |
Enable Conditions |
Conditions on which the custom stage should be applied to the item. |
Apache Tika
Binary Content Analysis applied to items before being processed to the search engine.
Configuration
| Property | Description |
|---|---|
Tika Server URL |
URL of the Tika Server. |
Label |
Exclusive name of the stage. |
Enable Conditions |
Conditions on which the content of an item should be processed. |
Custom Headers |
Custom Headers to include to all requests sent to Tika Server. |
Header Name |
Name of the header to append for outgoing requests. |
Header Value |
Value of the header to append for outgoing requests |
Advanced Client Options |
If enabled, it allows you to configure advanced client connection settings |
Max. Connection Pool Size |
Max. number of connections maintained by the client connection manager |
Connection Timeout |
Client-side connection timeout |
Retry Interval |
Retry interval in duration between subsequent retries |
Max. Retry Counts |
Max. number of retries |
Mime Type Detection |
This step detects the mime type for an item by parsing its binary content. The detected mime type is processed together with the original mime type to the search engine. |
Enabled |
If disabled, mime type detection is skipped for all items. |
Only If Missing |
If set to true, mime type detection is applied only for items with missing media type. |
Content Extraction |
This step extracts a content text for an item by parsing its binary content. If non-empty text was extracted for an item, the item is processed as text document to the search engine together with the extracted content text. |
Enabled |
If disabled, content extraction is skipped for all items. |
Item Type Exclusions |
All items with item type configured in this list will be skipped from extracting their content text. |
Media Type Exclusions |
All items with media type configured in this list will be skipped from extracting their content text. |
Language Detection |
This step detects the language of the item content. The detected language code is supplied to the search engine as item metadata. |
Enabled |
If disabled, language detection is skipped for all items. |
Only If Missing |
If set to true, language detection is applied only for items with missing language code. |
Replace Provided |
If set to true, the provided language will be overwritten by the detected language. If this option is disabled, the detected language will be appended to the list of provided languages. |
Metadata Extraction |
This step extracts additional metadata for an item by parsing its binary content. |
Enabled |
If disabled, additional metadata extracted by Tika will not be processed to search engine. |
Metadata Prefix |
The specified prefix will be appended to all metadata keys extracted by Tika. |
Content Manipulation |
Manipulation of content text. |
Regular Expression Manipulations |
Regex manipulation steps applied sequentially. |
Regex Pattern |
The regex pattern to match and replace with the provided value. |
Value |
The value to replace the matched content text with. |
Enable Max. Size |
If disabled, entire content will be processed. |
Maximum Content Size |
Maximum length of the content, if this limit is exceeded then the content is truncated. |
Stage Conditions
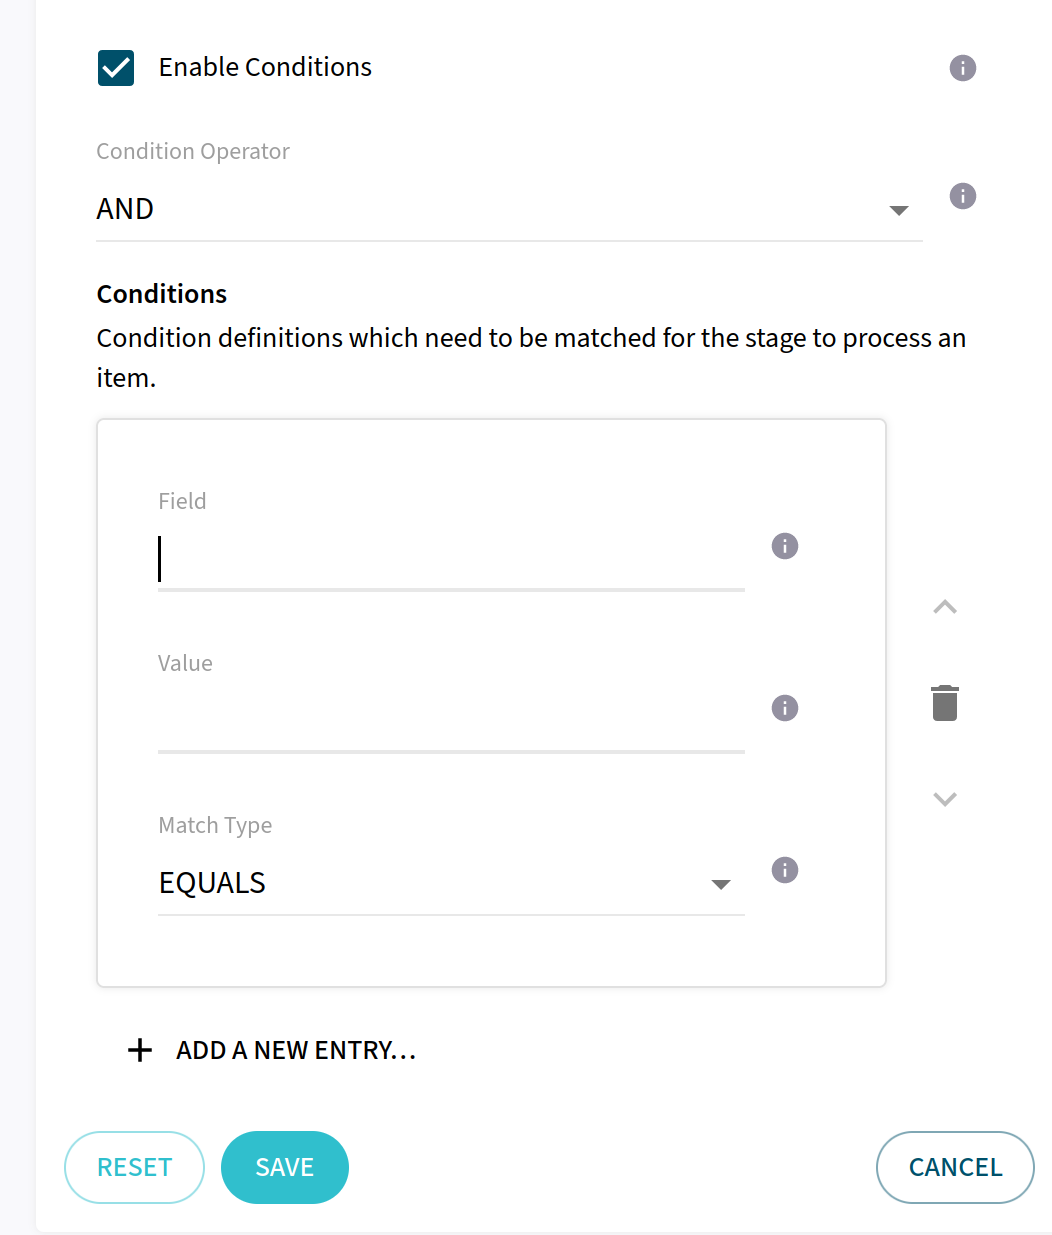
You can apply a stage to items under specific conditions by clicking 'Enable Conditions' for each stage.
| Property | Description |
|---|---|
Enable Conditions |
Allows the configuration of conditions which an item must fulfill to be processed by this stage. |
Condition Operator |
Sets if all conditions (AND) or any single condition (OR) need to be fulfilled for the item to be processed. |
Conditions |
Condition definitions which need to be matched for the stage to process an item. |
Field |
The metadata field which should be checked. |
Value |
The value which the metadata field should contain. |
Match Type |
The type of matching used to check if the metadata values fulfill the condition. |
How to add a Custom Stage?
The connector offers the opportunity to create custom stages and integrate them into the pipeline.
Implementation
To achieve this, you must develop against the provided interface RaytionPipelineStage within the raytion-custom-stage-api Jar.
Raytion Gen9 Connectors, as of the current moment, are written for Java 8. Therefore, customized stages must also be developed with Java 8. Logging inside a custom stage is recommended to be done via slf4j-api.
Setup
To use your custom stages in Gen9 Connectors, please closely follow the following steps:
-
Shut down your Connector
-
Navigate to the folder
<CONNECTOR_HOME>/bin/where<CONNECTOR_HOME>is the installation folder of your Connector -
Depending on the Operating System the Connector is installed and run from you will want to edit the connector.sh or alternatively connector.bat. If you are unsure, please create a backup of the file.
-
Add to the default JVM options:
-
Connector.sh: Add
-Dloader.path=$APP_HOME/lib/ -
Connector.bat: Add
-Dloader.path=%~dp0../lib/
-
-
Change the execution argument from
-jarto-cp. -
Append the main class to
org.springframework.boot.loader.PropertiesLauncherby adding it to the end of the execution command.
-
-
Put all the custom stage JARs that you have implemented and want to use, along with the provided raytion-custom-stage-api Jar into the folder
<CONNECTOR_HOME>/lib/where<CONNECTOR_HOME>is the installation folder of your Connector -
Start the Connector via the
connector.shor theconnector.batfile.
When you did everything correctly the connector should start as it did before without issue.
Configuration
-
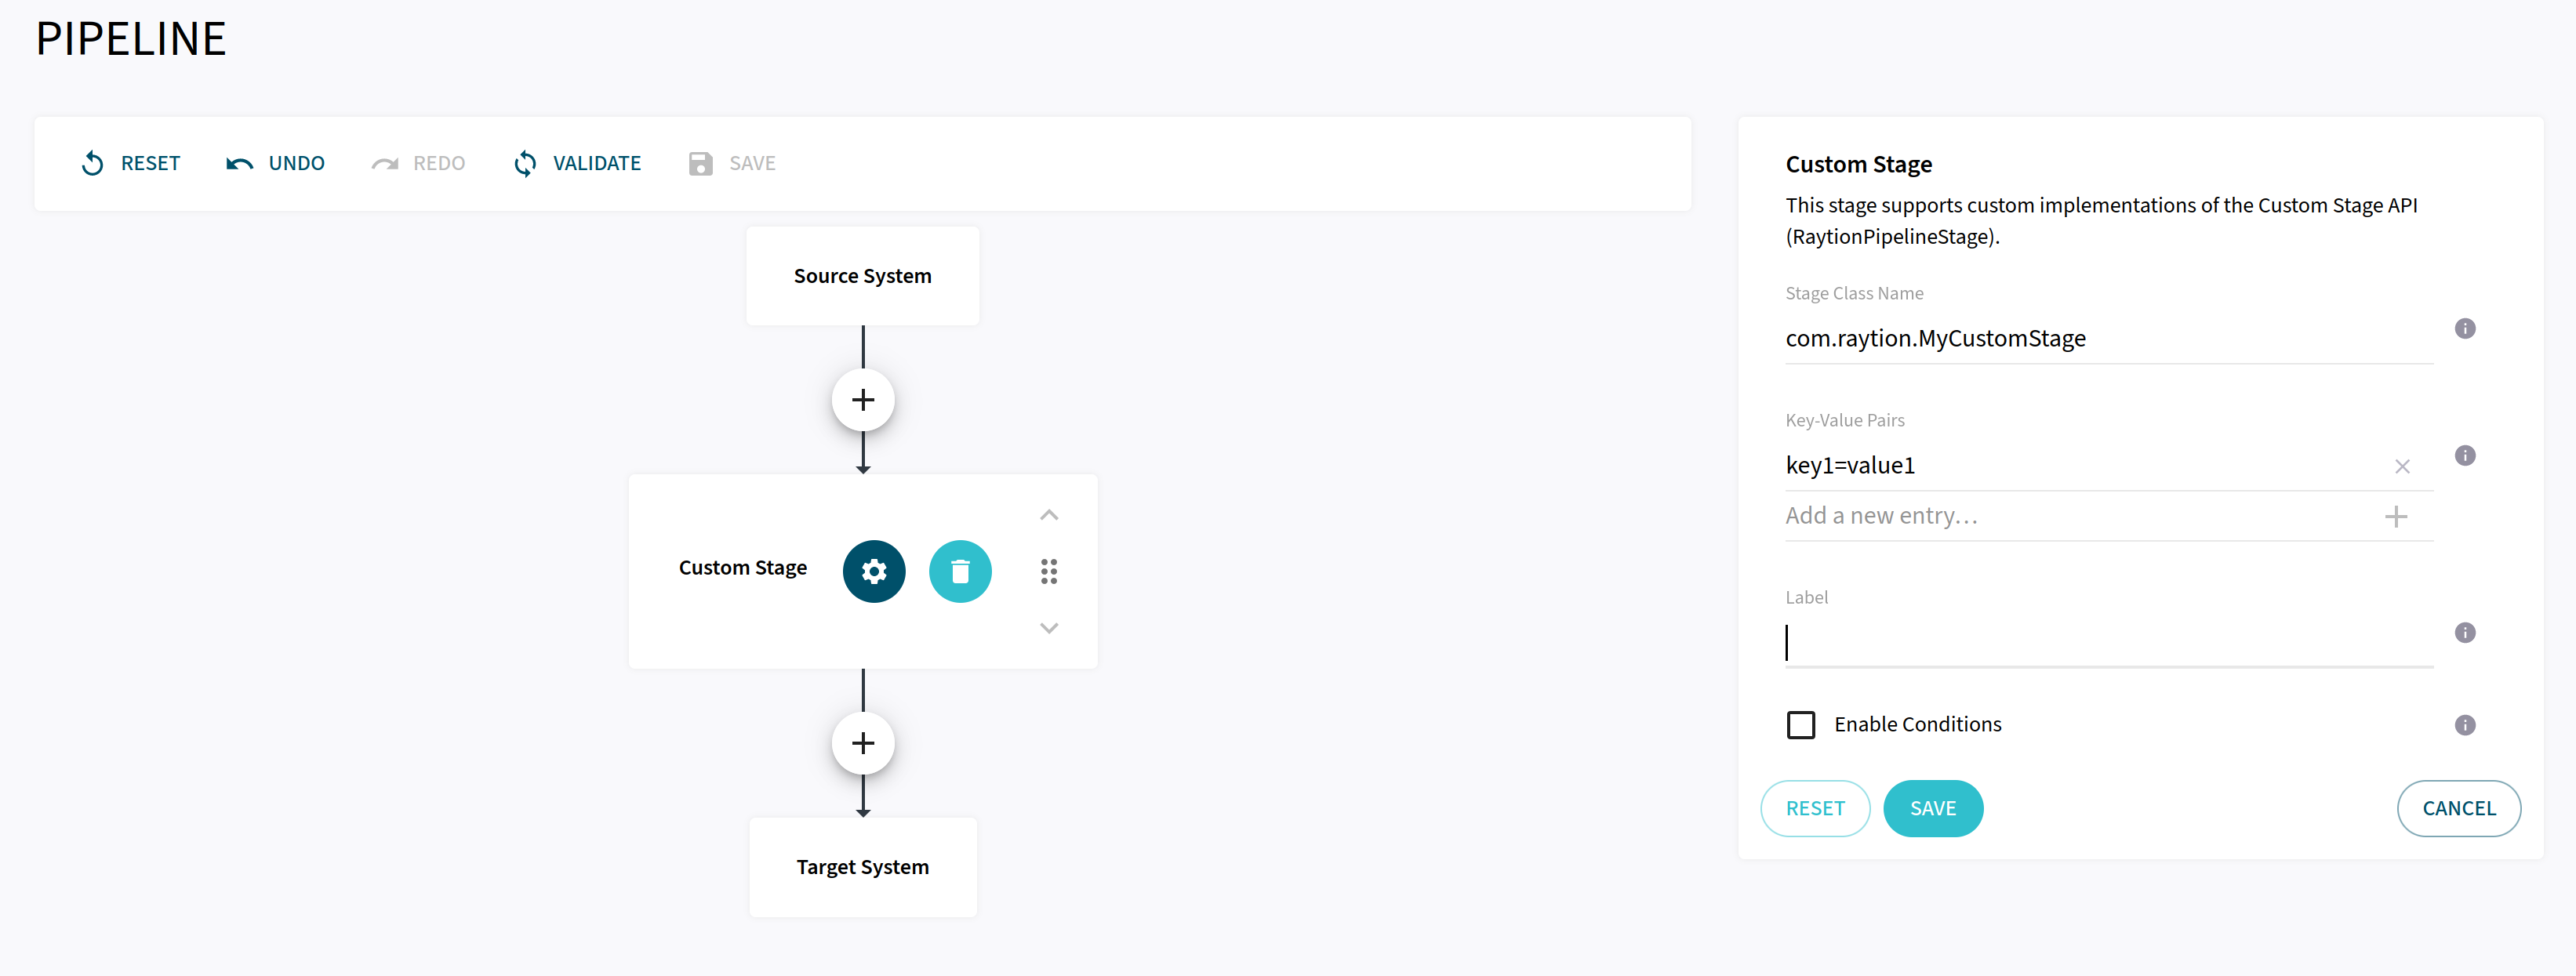
Navigate to the Pipeline tab in the Connector interface.
-
Add a stage via the
+-Button and select the Custom Stage. -
Configure the fully qualified class name of an implemented stage you added to the Connector in previous steps.
-
Set up Key-Value pairs to be passed to the stage by configuring them, where keys and values are delimited by
=. -
Once you are done with the stage configuration, make sure to hit
SAVEon the right. -
Click on
VALIDATEat the top of the page and then onSAVE. After that restart the connector by clicking onApply Changes.